What are API requests?
API is a method through which one program can “negotiate” with another. You can ask Oki-Toki to transfer or receive the necessary data. For example, automatically send customer information to your CRM or load data back into Oki-Toki.
What is the benefit of API for a call center?
- Automation: API takes on routine tasks. For example, a new contact is sent to your CRM, automatically updating the data;
- Integration: with the help of API, it is easy to link Oki-Toki with other systems – CRM, analytics, chatbots, etc. All tools work together as a whole, which makes business processes simpler and faster.
- Real-time data: the system sends or receives information as soon as it appears. This is convenient for analysis, monitoring;
- Easy scaling: you can add new features and tools without complex changes. This is especially convenient if your project is growing;
- Reducing the number of errors: less manual work — lower risk of making mistakes. Everything happens automatically, quickly, and accurately.
Types of API requests in Oki-Toki
Oki-Toki uses the standard method of interaction with web services – REST API. The system receives information on request and provides a response in the desired format, most often JSON. The following request methods are available in Oki-Toki:
- GET – used to retrieve information, such as contacts from CRM or call statistics;
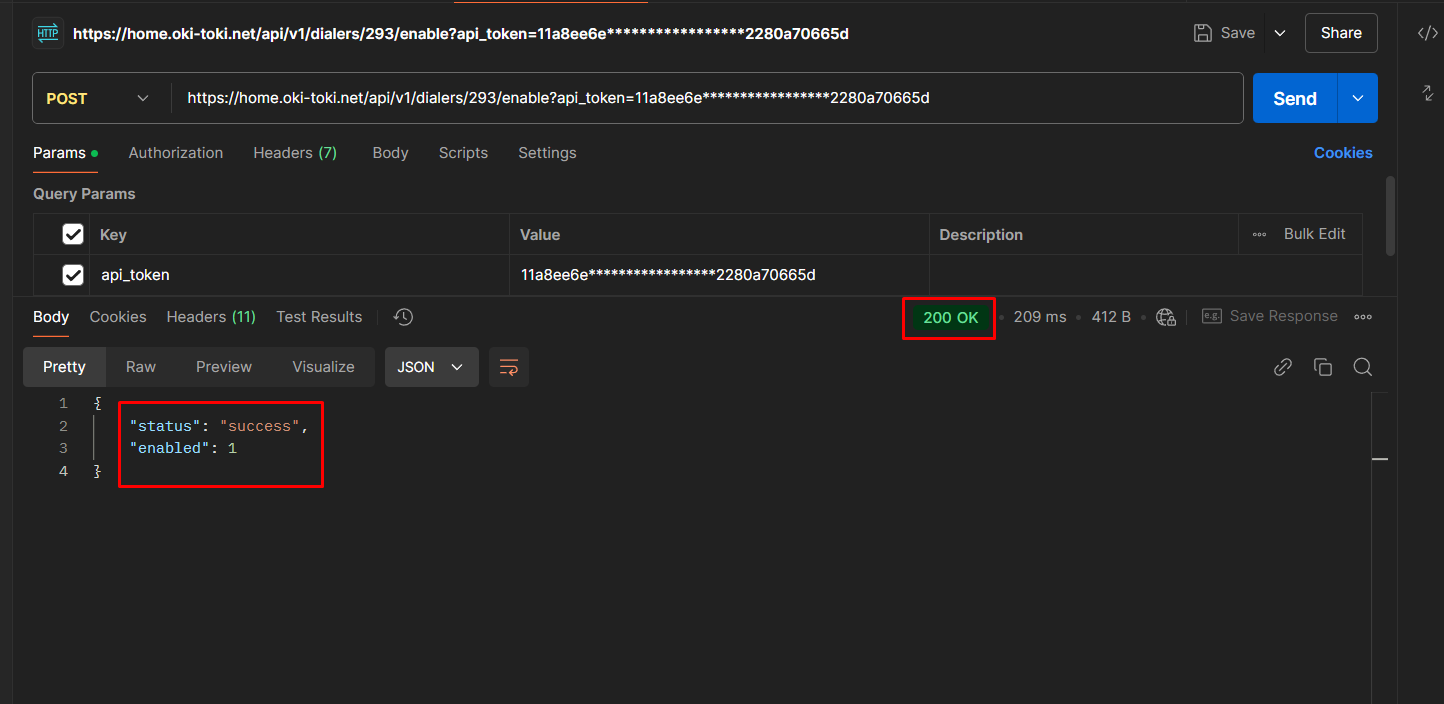
- POST – sends new data to the system, such as mass adding or removing dialer tasks, turning the dialer on/off.
To test a request, check the correctness of data, or find an error, Postman is suitable.
Documentation and API setup in Oki-Toki
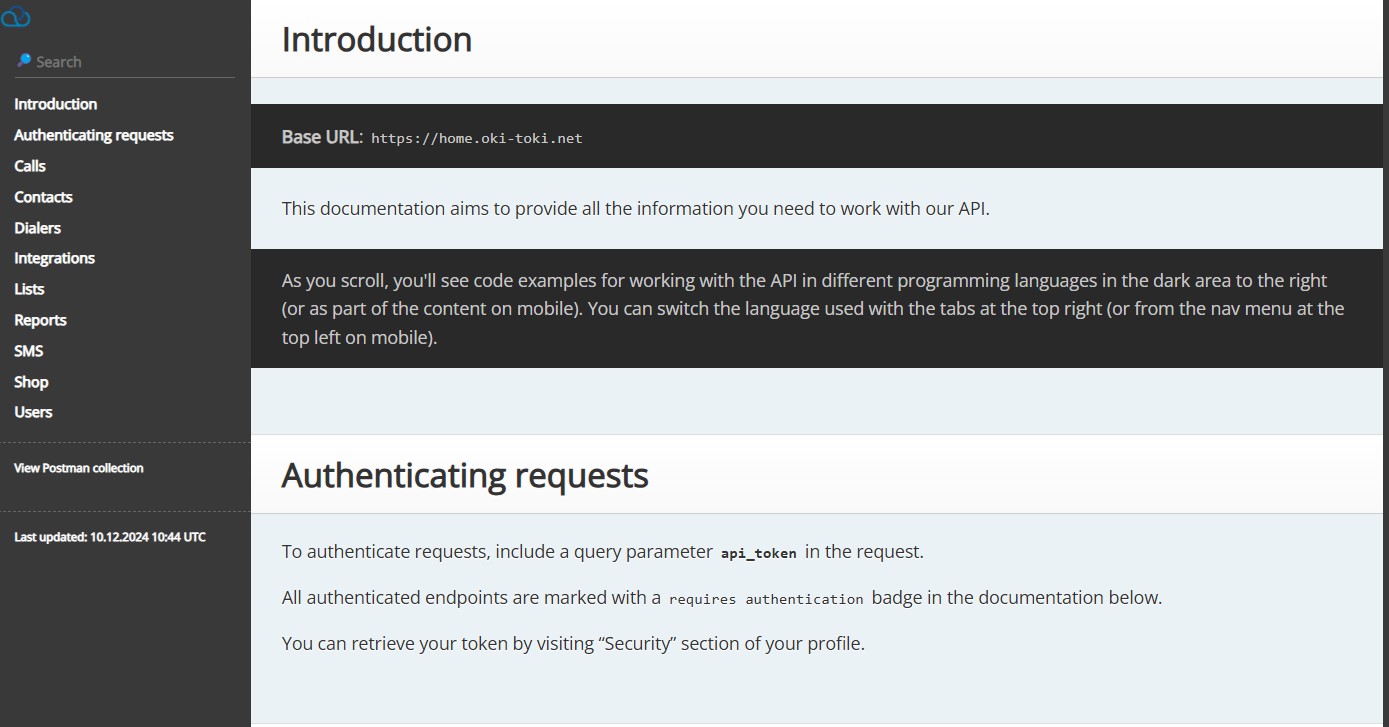
Oki-Toki API documentation is your guide to working, describing request methods, usage examples, and data structure. For convenience, the API technical documentation is divided into sections based on Oki-Toki main functions and tools.
Access to API
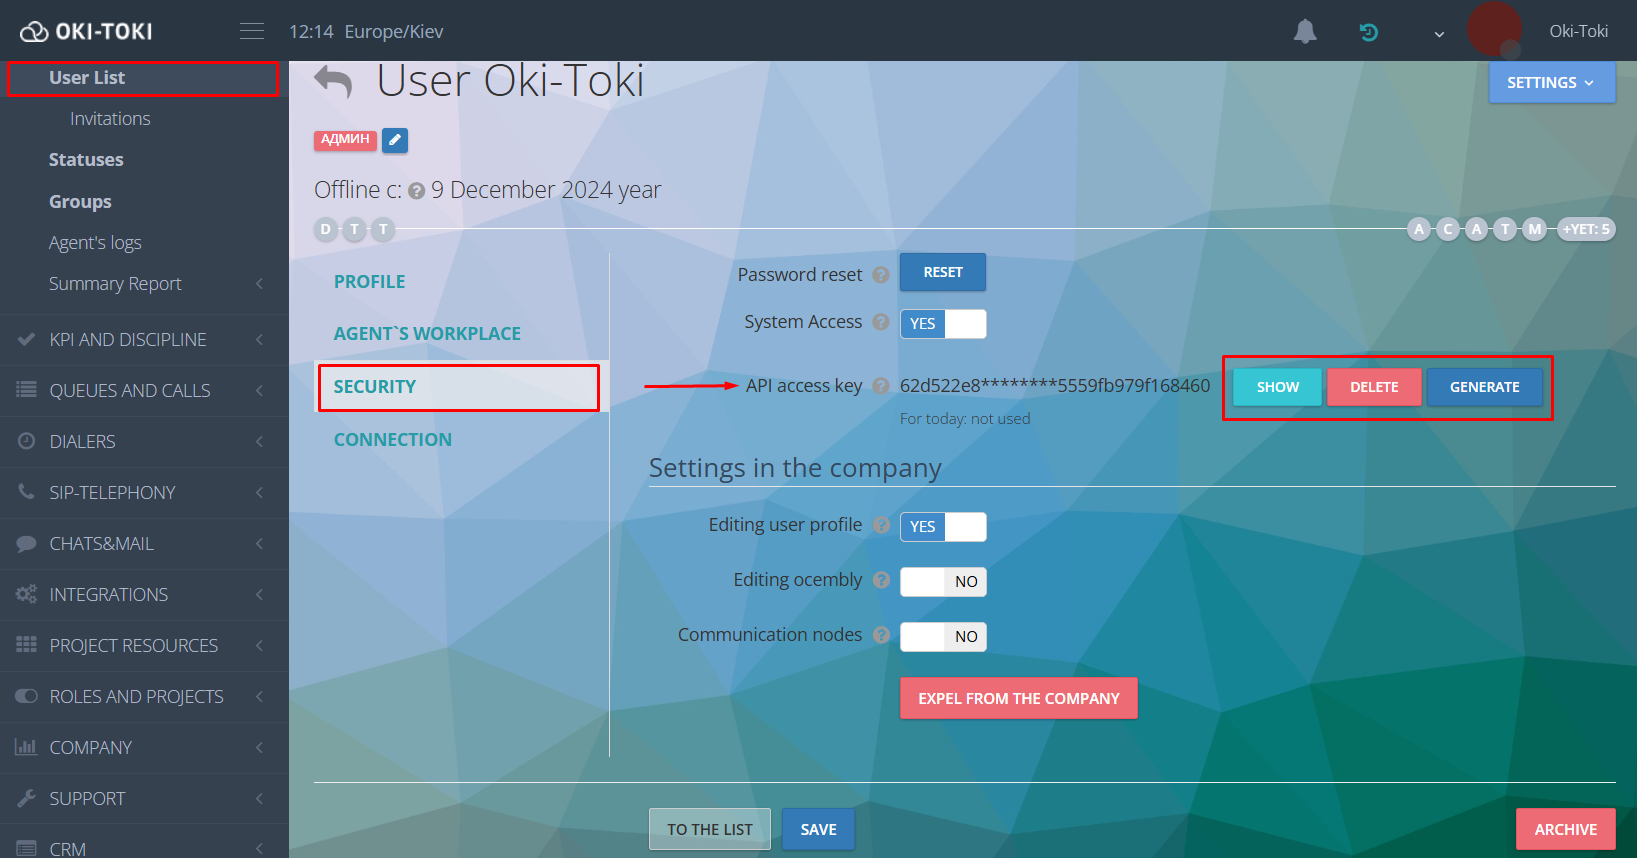
Access to API is done using tokens – these are keys that let the system understand who is accessing it. With them, it’s easy to work with the API and securely transfer data. In Oki-Toki, a user can create their token when they have the “Manage users” right in their Role. Such a right is available in default roles “Admin” and “Supervisor” , but it can also be added to any role you create.
“Managing external resources, integrations, and events (Webhook)” is another right needed for working with API. Without it, creating an integration or adding a Webhook won’t be possible.
Learn more about roles in a separate article on the blog.
How to get an API key?
To create any API request, you need a token. To generate it, go to the Users list section. Select the “Security” item in the profile settings. Here you can create, view, or delete a token.
API request error codes
Everyone can make mistakes – even professionals encounter difficulties in transferring data or performing tasks. The main thing is to know how to fix it. We have prepared a list of the most common errors when making an api request:
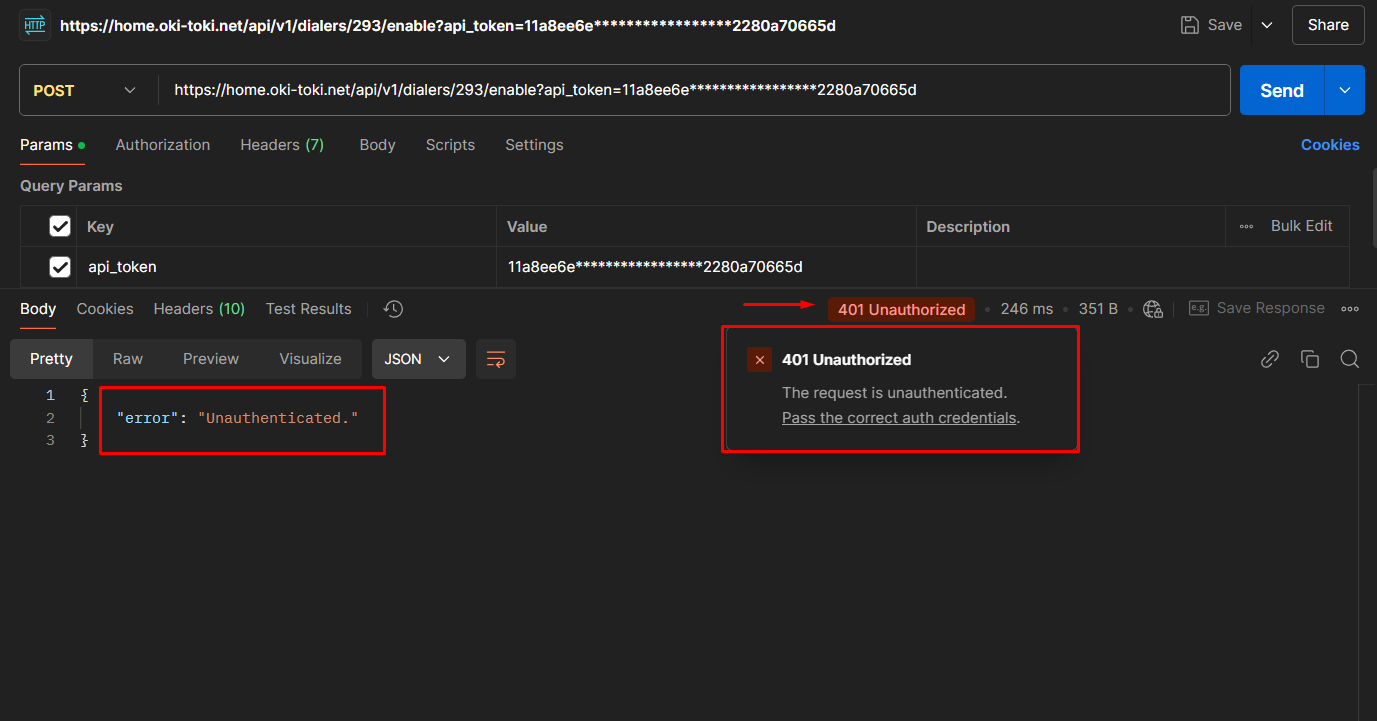
- 401 (Unauthorized) – the request specifies an nonexistent object or your token is incorrect;
- 403 (Forbidden) – it means that the server understood the request but refuses access. You may not have the rights and permissions to execute this request;
- 404 (Not Found) – in the URL-link there are errors, check the accuracy of the entered data;
- 405 Method Not Allowed – incorrect request type. For example, you tried to use the POST method instead of GET;
- 422 (Unprocessable Entity) – the request is accepted, but was not processed due to a semantic error in the “body” of the data;
- 429 Too Many Requests – exceeding the request limit;
- 500 (Internal Server Error)– problems with the server’s operation or processing your request.
Each API error is accompanied by a code and a message that will help determine the cause of the problem and fix it.
Examples of using API in Oki-Toki
Oki-Toki API is a tool for solving many tasks in a call center. Here are some examples where its use can save time and simplify processes:
- Adding customers to a dialer for post-processing of incoming calls/cold base – after a successful connection with an agent, the data is automatically transferred for further dialing. This saves time and reduces the risk of errors by eliminating manual processing;
- Deleting tasks from a dialer – tasks that have been processed and are no longer relevant because customers have declined will be removed from the dialer list;
- Transferring call data to CRM – all necessary call data needed for further work with the customer will be transferred to the CRM;
- Updating contact in CRM – For example, changing the status of tasks or adding new parameters for analysis.
How to create an API request?
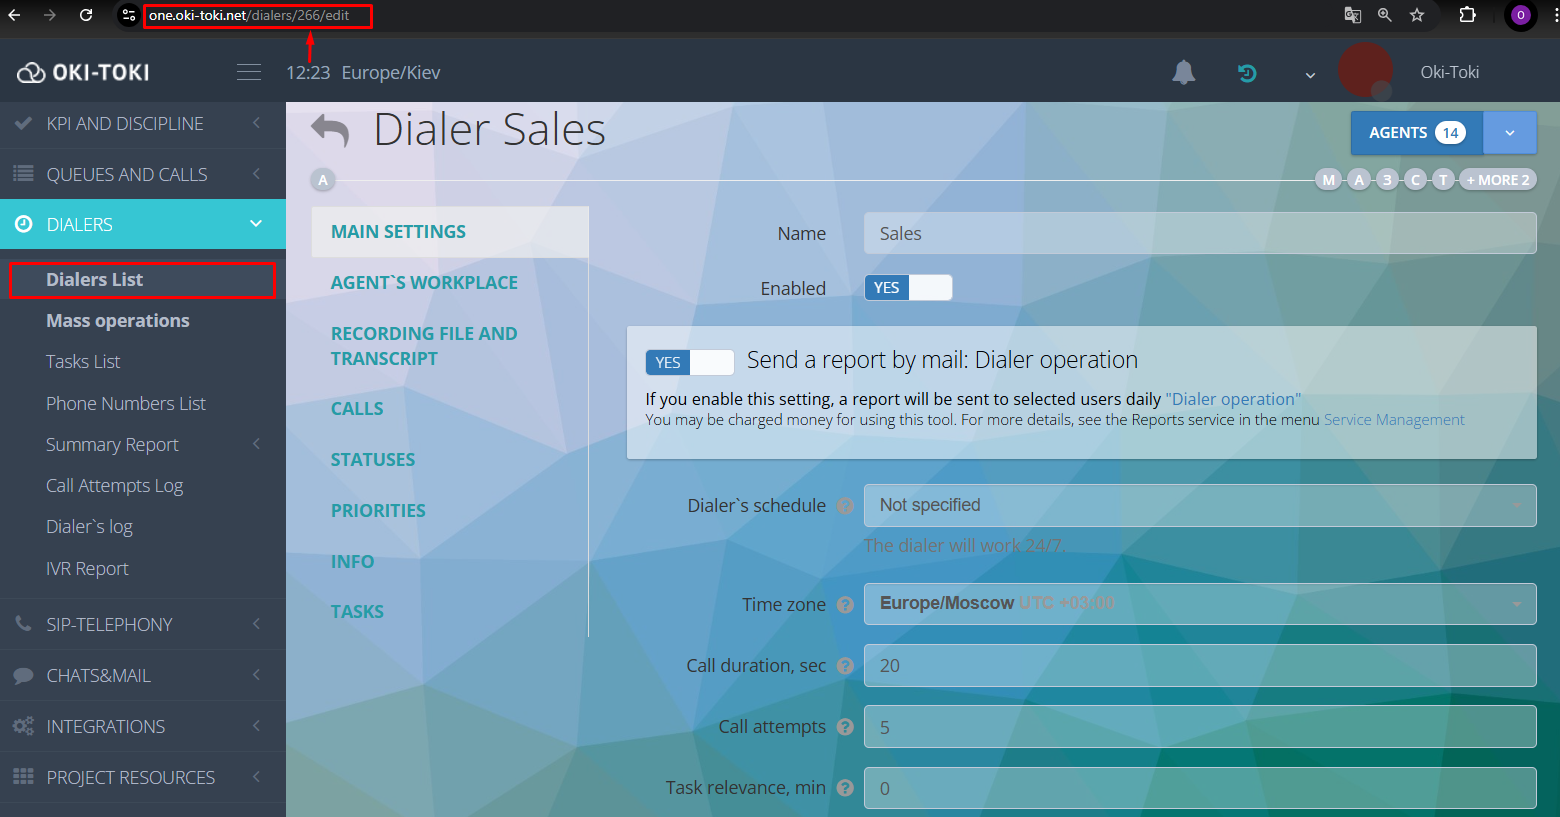
To create a request for working with data in Oki-Toki, first familiarize yourself with the API documentation. Here is collected information about what data can be transferred or received. Choose the necessary request and see what additional information may be needed, for example, ID of the dialer.
To find this data, go to the required dialer. The ID will be indicated in the link in the browser address bar — this is the number after the name of the tool.
Example of an API request in Postman: adding to the blacklist
We will formulate a request link in the Postman program, which will need to be installed on your device.
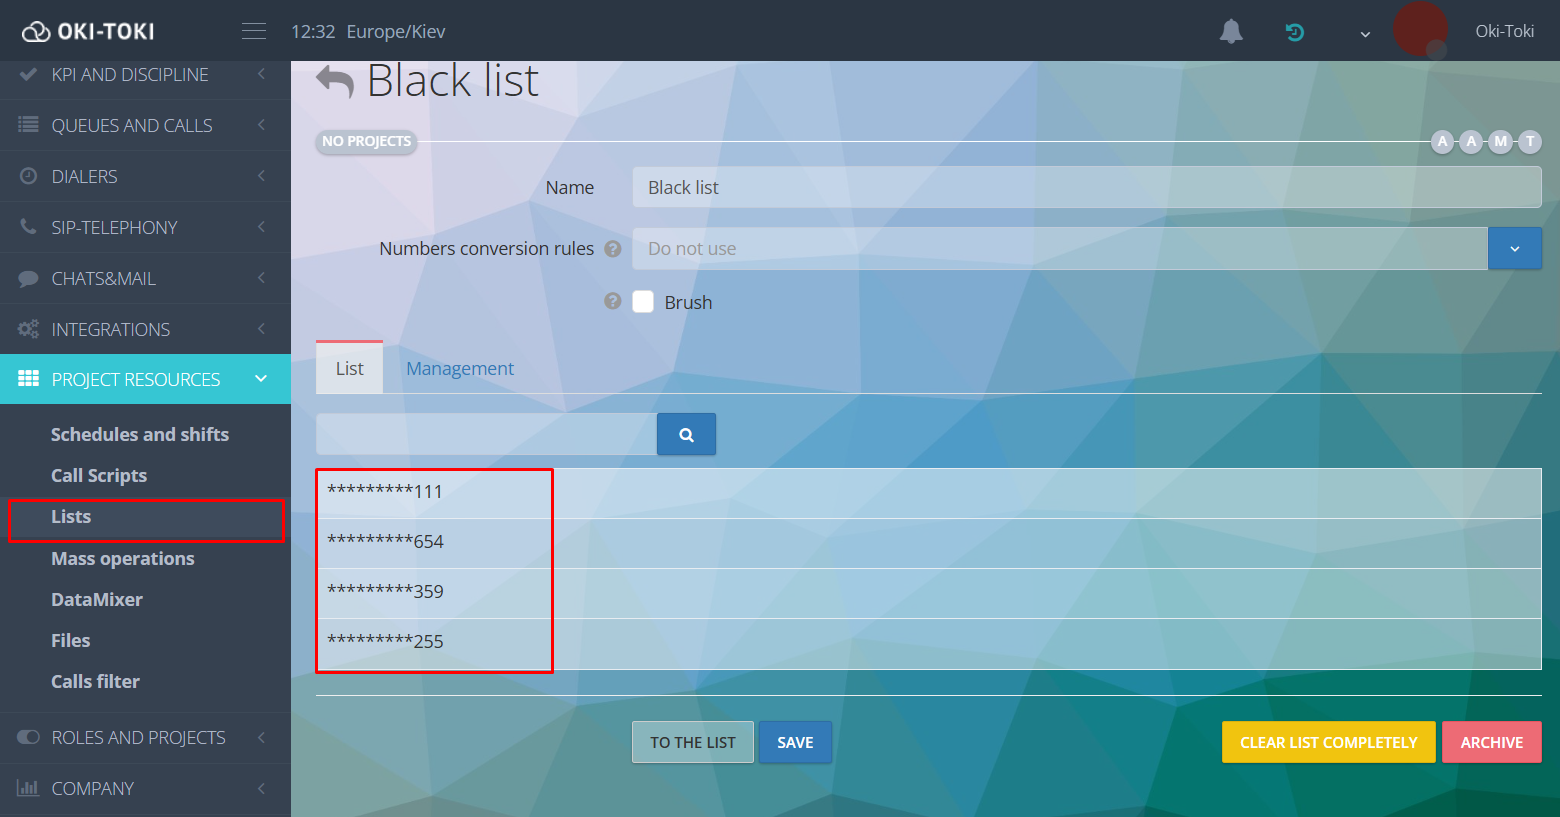
We find in the Documentation the section “Lists”, select the request “Adding a value to a list“. The request adds data to your Lists. It doesn’t necessarily have to be the “Blacklist”, maybe you want to supplement the “VIP client list” or any other that suits your business processes.
Let’s proceed to formulating the API link:
- look in the documentation for the type of request – in our case, it’s post and copy the URL-link https://home.oki-toki.net/api/v1/lists/add. Go to Postman, set the type and insert the link.
- the next step – your token. How to generate a token we described above in the article;
- in the request, it is necessary to specify the list ID parameter. To do this, go to the Lists section, find the required one, copy the number from the address bar and transfer it to Postman.
- The “values” parameter needs to be supplemented with the data that will end up in the list, for example, a phone number;
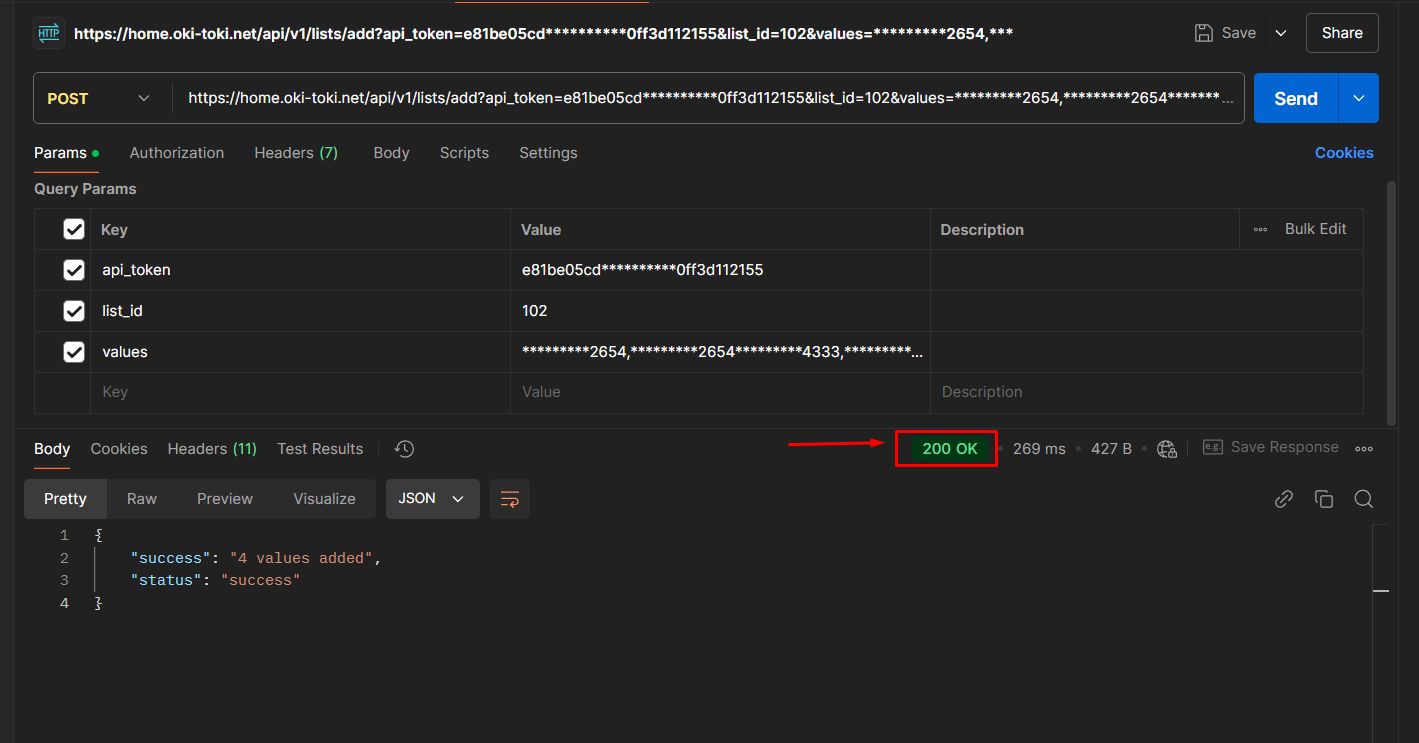
After entering all parameters, we form a link in this form: https://home.oki-toki.net/api/v1/lists/add?api_token=(YOUR TOKEN)list_id=101&values=(PHONE NUMBER)We generate a request, if everything is correct we receive a response – 200 OK. Now the required number is added to the blacklist.
To set up different conditions for requests to be triggered, use events. They allow not only transmitting data about calls and customers but also information about violations, user statuses and the triggering of speech analytics. This allows monitoring key performance indicators of agents, their activity, recording deviations from scripts or disciplinary violations to maintain a high level of service quality.
How to set up API integration?
If you need to connect Oki-Toki with an external resource, integration API can help. For example, transferring customer data or adding a number to dialer can be automated through the API. The settings consist of two stages:
Stage 1. Creating a webhook
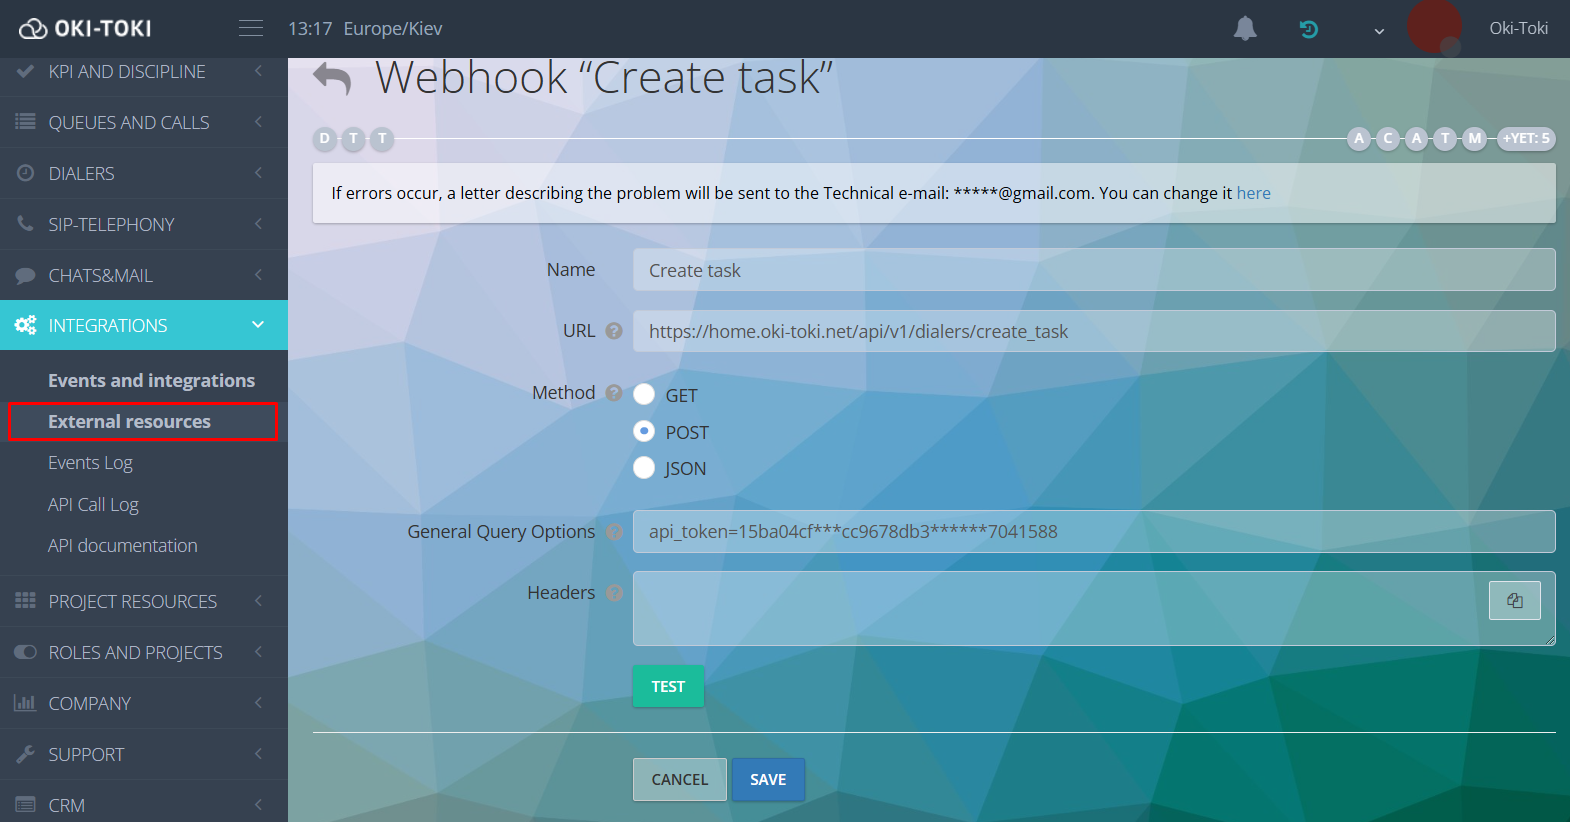
First, you need to create a webhook in the External resources section:
- Specify the name;
- In the URL line, transfer the link, depending on the task at hand. For example, to add a task to dialer, you need to find the API request “Adding a task (number) to a call“ in the technical documentation, copy the link and paste it into the URL line;
- Choose the data transfer method from the list: GET, POST, JSON;
- In the “Common request parameters” line, enter your access key in the format: api_token= YOUR TOKEN.
The example shows how to create a webhook for automating tasks within Oki-Toki. If the URL line specifies a link to an external system, then oki-toki will integrate with it. Read how to integrate a chatbot with Telegram on our blog.
Stage 2. Creating an event
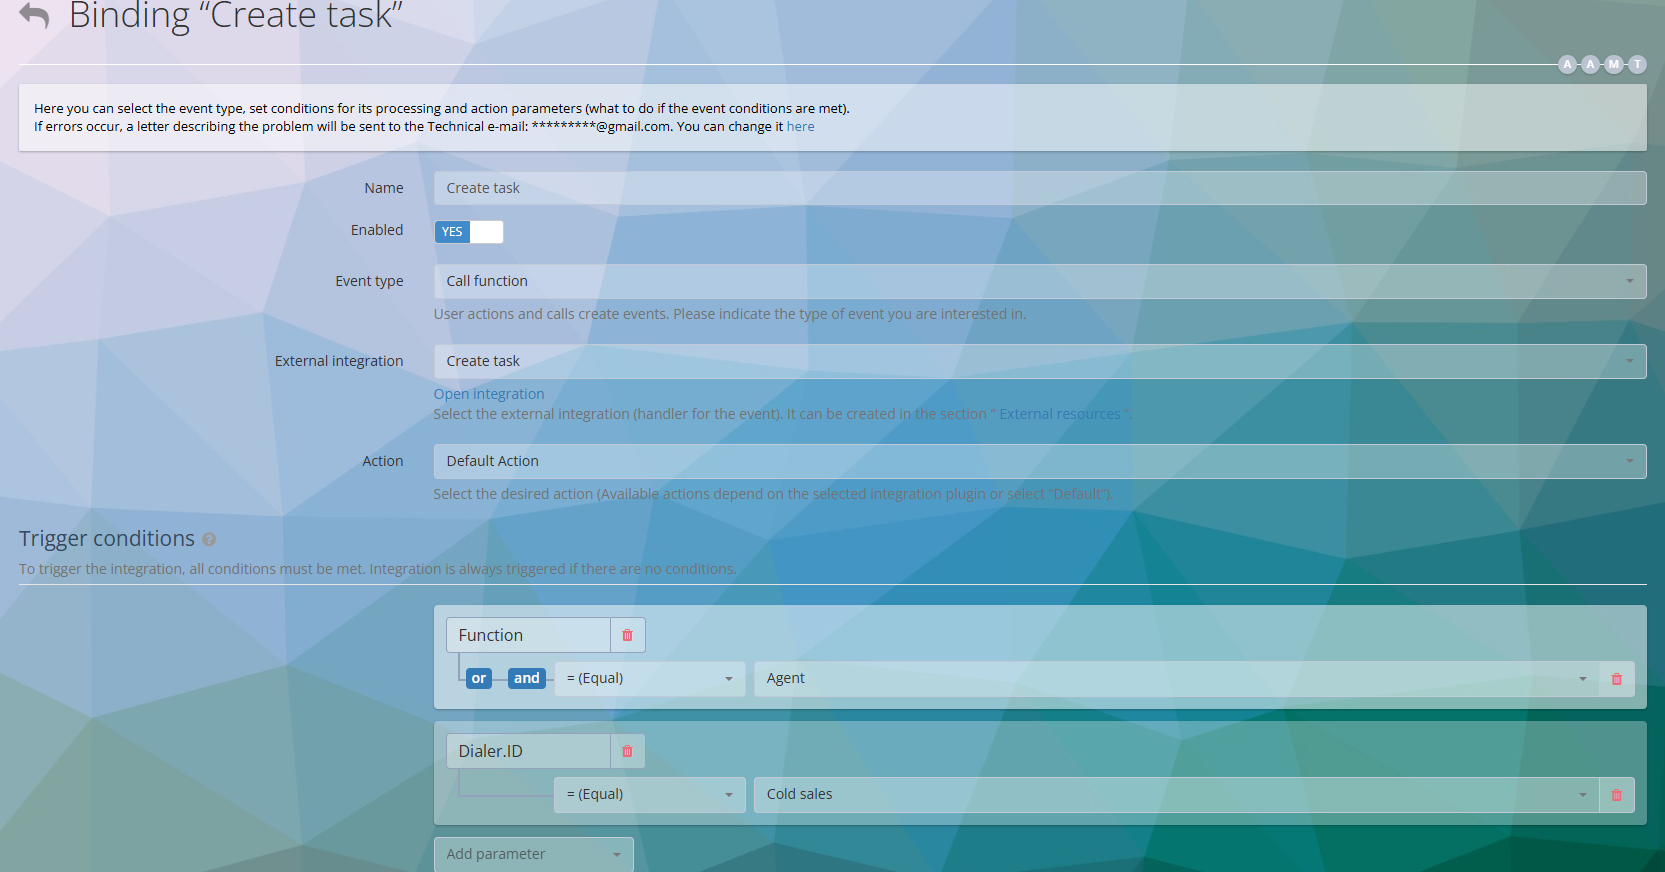
Go to the Events and Integrations section and create a new binding.
- Indicate the name and type of event (user actions, calls, violations);
- External integration – select from the list or add a new external resource;
- Trigger conditions – set a trigger for the event to occur. The list of conditions depends on the type of event;
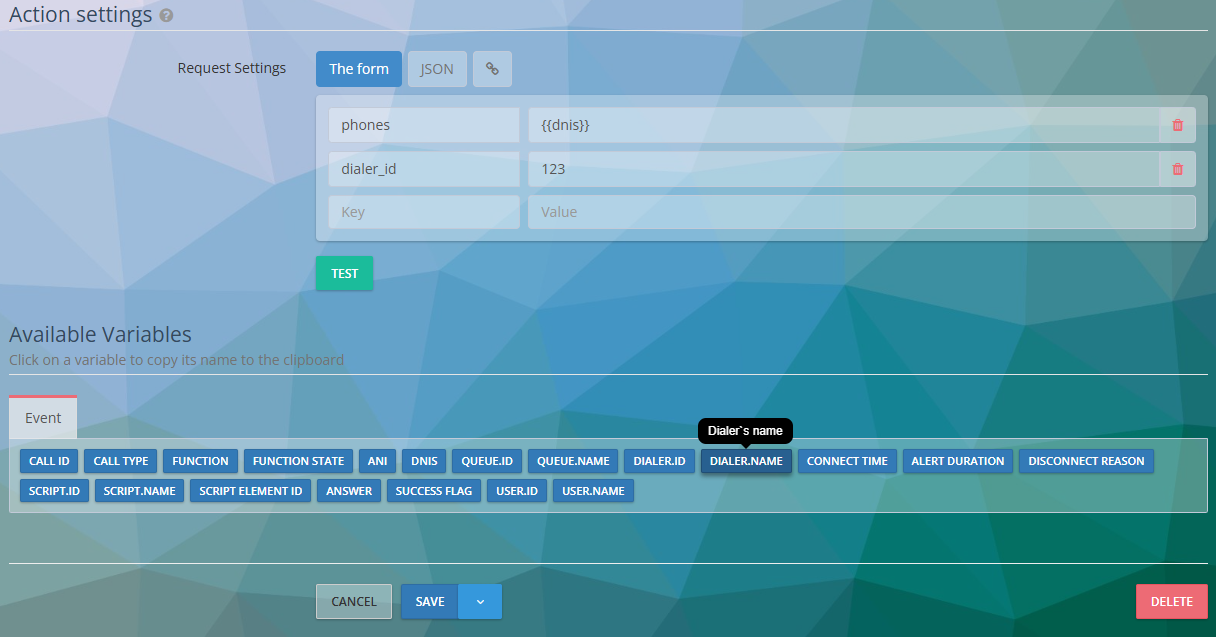
- Action parameters – this line must contain data to detail the request. Available parameters that can be used in the request are indicated in the documentation;
- Variables are listed. Clicking on the needed one will copy it for filling in action parameters.
Reporting and costs for API requests
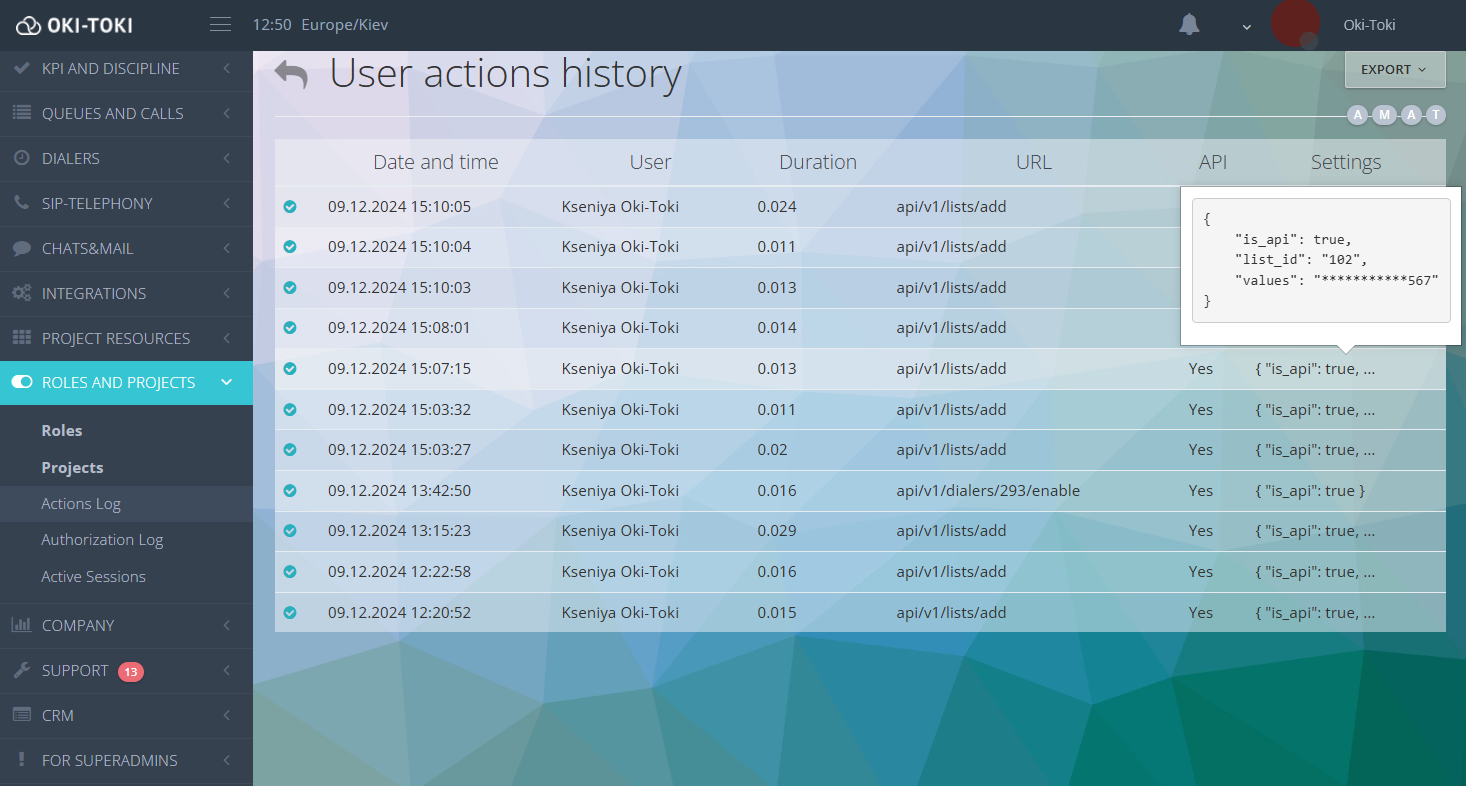
You can monitor how requests are executed using API call log. The report is generated by date, users, duration of execution, and type of request – select API. The ready report contains information about the date, time, duration, and the name of the user who created the request, as well as the URL and parameters of the request. Export is available in HTML, Google Sheets, and Microsoft Excel formats.
In the Event log you will find information about which events were processed and with what result. The report contains the name, type of event, integration, date of creation and processing, current state (successful, unsuccessful, or pending), as well as data involved in creating events and integrations using API.
API requests – a paid feature, you can find out information about the cost in the section Service Management. You can conveniently track your daily debits in the Balance Log.
Following this guide and using the documentation of Oki-Toki, you can setup data transfer and API requests. Integrations and webhooks from Oki-Toki will solve most practical tasks quickly, efficiently, and without extra effort. This will optimize many of your company’s business processes and allow you to focus on the main thing — quality work with clients.

